
Tyler Clary
Michael Phelps and Tyler Clary via The LA Times
He finished second to Michael Phelps in last night's race and secured his spot on the US Olympic Team. I couldn't be more proud that such an amazing athlete and person will be representing the United States. I hope you will root for him this summer :)
Guest post by Christine at What's Up Cupcake?
One of my favorite bloggers, Christine from What's Up Cupcake, sewed up the cutest Hazel dress and I have been dying to share it with you. Not only is it super adorable, but it's based on one of Lady Mary's dresses from Downton Abbey who I love! Hopefully, you can gather some inspiration from Christine and Lady Mary while you are working on your own dresses. Thanks for sharing with us, Christine!
________________________________________________

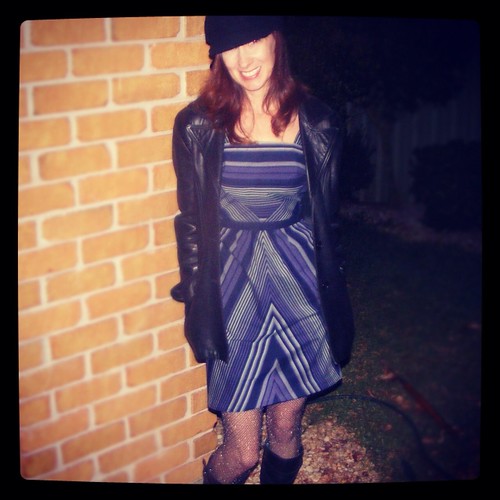
Hello everyone! Christine here, from What's Up, Cupcake? Blog. Can I tell you how excited I was when I saw the announcement for Sew Colette 2? I participated in making a couple of the garments from the first round, but can’t wait to create even more with their pre-packaged patterns, many of which I’ve already made a couple of times. They’re just so easy to work with!
Today I’m sharing with you my version of the Hazel dress and the first pattern in this round of Sew Colette. I was so eager to get my hands on this pattern as I had big plans in store for it. Big. HUGE.

I’m a total Downton Abbey junkie, and had been looking for a dress shape to make into a modern version of Lady Mary’s garden party dress. I wanted to replicate the various angles of the stripes (see the bodice front – they’re both horizontal and vertical) and in the back they were diagonal. There is also a contrasting band on Mary’s dress, so I decided to replicate the look with an optional belt in dark grey.

The thing I love about Colette patterns is that I don’t usually have to make any fit adjustments. Her patterns seemed to fit my body shape perfectly, so I assembled the dress exactly as described in the pattern directions. The only change that I made was in the direction of the stripes. For the back of the dress, I carefully laid out the back pattern piece so that I would have the stripes angled in towards the center back of the dress. I also played around with the direction of the stripes for the strap, eventually settling on the horizontal direction so that they matched the striped running across the front of the dress.
I made the belt using Sunni’s belt kit. It’s so easy to use and can be a great accessory for any of your custom creations.

The last feature that I added was really the finishing touch, that made it the ‘Garden Party dress’ in my eyes. I added a strip of lace to the front bodice with three vintage buttons running down it.

I love the versatility of this dress. I’m thinking of playing with a variation of the straps for Sew Colette 2, and using a printed fabric for a different look.
What’s going to be your take on Hazel?
Winning pattern


The Macaron dress will be the next pattern we are sewing for Sew Colette 2.0. Be sure to order the pattern before we get started in August. I'm super excited about this one!!! Thank you to everyone who voted!
My Hazel muslin


Hazel fabrics

When you are choosing your fabric think about the look you want to achieve. Do you want to keep your fabric simple and jazz it up with embroidery, piping, add a colorful sash or a cute cardigan?

Do you want stripes to take the center stage? The different directions of the lines makes for a very eye catching look.

Remember to consider the placement of the fabric. Mela's version is stunning.

P.S. Remember to go to my sidebar and vote for the pattern we will be sewing up in August! Stop by Sarah and Rochelle's blogs for two extra votes! Only a few more days before we announce the winning pattern.
_____________________________
The Hazel Schedule
Monday, June 4th: The Muslin
Monday, June 11th: Fit Techniques
Monday, June 18th: Fabulous Fabrics
Monday, June 25th: Sewing Hazel
Monday, July 9th: Hazel Parade
Vote for the next pattern!

Hazel muslin - WIP
When I start with a new pattern it takes me a little while to get going because I split everything into different days (kind of like Sarai). One day I trace the pattern, one day I cut the fabric, and the next day I am free to sew! On Monday night I began tracing the pattern and learned some new things. Specifically, wax paper and parchment paper are completely different.


Last night I started sewing my wearable muslin and it's coming together really quickly. If some of you are on the fence about sewing along, it's not too late to join Sew Colette by any means! There is still plenty of time!
How are your muslins coming together? Any problems with fit? Sarah has written up some great posts on fitting: Calculating ease for a full or small bust adjustment, making full or small bust adjustments, bust dart adjustments, pivot adjustments and adjusting the bodice length.
Three reasons why I haven't been sewing as much in the past week
Here are the three reasons why I haven't been sewing as much in the past week:

Lebron James the human and Lebron James the cat.
1. BasketballIf you didn't know, my husband is borderline obsessed with basketball. He just saw me type that and argued with me, but he needs to learn to admit it. If he's not playing two to three times a week then he's watching it on tv. Since it's playoffs you can imagine how much tv I've been sucked into watching. If it was any other sport I wouldn't care, but I do like basketball! I know so many facts, scores, and statistics that I get into debates/conversations with people and then creep myself out because I know so much random stuff. Once the playoffs are done I will settle down. Oh, I'm rooting for Miami in case you were wondering. I love Lebron, my cat is named after him!

Youth of Today
2. Hardcore musicOver the last ten years I have been fortunate enough to see some great hardcore bands, but on Saturday night I saw legendary hardcore bands at the Glasshouse in Pomona, California. Bold, Sick of it All, and Gorilla Biscuits were great, but Youth of Today blew my mind. The singer, Ray Cappo, has this captivating quality and I loved what he had to say in between songs. He touched on something that I have struggled with for the past five years and reminded me that I am doing the right thing (for myself) even though I have been questioning my reasons.

Thumbs up for being a LOSER.
3. Intoxicated guyAt 1:45 in the morning my dog Frankie started barking like crazy. My husband walked into the other room and saw that some loser was trying to get into our house by pulling on our locked sliding glass door. I don't know if you know this, but one of my biggest fears is looking outside at night and seeing either Marilyn Manson or Lil Wayne staring back at me (seriously). Random dude ranks third. We called the cops, but this dumb dumb kept trying to get in. Luke yelled at the guy and after exchanging a few words it was obvious that he was intoxicated. (Side note: have you seen my husband? The last house I would want to get into would be his.) Before Dummy ran off I went into blogger mode and took a photo on my camera for the cops (I'm not posting the photo of his face). When the cops showed up they said, "to call if he comes back." Cool. Imagine how hard it is to fall asleep after that. The next day I called the cops again because homeboy left his vial of pills, an iPhone, and an ugly shoe in our yard. I'm pretty pissed because the cops probably aren't going to do anything even though I have a photo of him, his gear, and finger prints on the door.
Basically I am now tired, LIVID, and stressed out :( Anyone want to take some boxing classes with me? Erin? Shannon? Noelle?
My "Aloha!" Mood board

Aloha! I'm not sure if it's the warm weather, the fact that I am obsessed with Pina Coladas, or that I am very much wishing I was in Maui, but I'm going to go with the beachy theme I can't seem to get out of my head and incorporate it into my daily life through sewing.
How will I do this? Well, I'm going to make a mini mood board to inspire me. It was Sarah and Rochelle's idea to make these for the sew-along and I think it's a great one. For spring I made an inspiration board full of pastels, but this time around I think I'm going to the beach! Let me show you how I made my board:

Next, I opened up my favorite design program on my computer, Adobe InDesign. I wish I could say that I was using the latest version, but I'm using CS3 :(


Be sure to check out Rochelle's blog for a Photoshop tutorial. Are any of you going to make mood boards? I think they are a fun way of staying motivated and inspired. I'm so indecisive though, I'll probably change mine up haha

Retro Hawaiian dress
Pink Hawaiian dress
Brown floral fabric
Pineapple fabric
Hibiscus
Girl with flowers
Pina Colada
Guest post from Sarai!
What a treat! Sarai, the designer of the Hazel dress (and all of Colette Patterns!), was sweet enough to do a write up with tips for sewing up the dress. Thank you so much, Sarai for always coming up such thoughtful posts! I always learn something new.
______________________________________________________

Despite the fancy-looking seams and all the ways you can play with prints, the Hazel is actually a very quick and easy dress to sew. That’s really the beauty of it; it looks far more complicated than it is.
Still, we thought a few quick tips would help get you going and make things even simpler or get your creative juices going.
- Have fun with fabric: This dress works really well with many prints. Think about ways you can use stripes, florals and border prints to maximum effect with the design lines. Hold up swatches and try to visualize what the scale and colors will look like, along with the direction of the prints.
- Line sheer fabrics: If your fabric is semi sheer, you may opt to line the dress. If you’re unfamiliar with lining, we suggest the excellent book Easy Guide for Sewing Linings by Connie Long. I’ll also be sharing my tips for working with eyelet for this pattern!
- Adjust the straps: When it comes time to sew the straps, they might not fit “out of the box,” so to speak. Our bodies are all a little different, so the straps are meant to be adjusted to the right length for you. Before you sew the straps in, test out the length. Pin the straps in the back, then pin them in the front to fit you just right.
- Fix gaping: When doing your muslin, look for any gaping at the top of the dress. WIth the straight-across cut, this is an important area to fit. If you have any gaping above the bust, take the neckline in a little at the center front side seam.
- Keep the grainline: If you make any adjustments on the front bodice, make sure that the side piece is still on the true bias. You always want that grainline to be pretty much parallel to the diagonal seam in front.
- Wear your muslin: Always make a muslin before cutting into your final fabric. Wear the muslin for about an hour to see how it fits you. Notice where wrinkles occur on the bodice. Is the height of the back bodice too high or too low? Is there gaping at the center front? Does the waistline hit at the right spot? The more questions you ask and answer about the muslin will help you create a perfectly fitted dress.
- Prevent seam stretching: Since the seams forming the V are on the bias, they will stretch very easily. The best way to prevent this is to staystitch the diagonal edges right after you cut your pieces out, being careful not to stretch them while stitching. Try to handle these pieces as little as possible when you’re not actually sewing with them.
- Use 3 rows for gathers: When sewing the gathers on the skirt, make sure to sew three rows of basing. The more rows of basting you have, the cleaner and more professional looking the gathers will be. To see this in action, check out these side by side comparisons on our blog: http://www.coletterie.com/tutorials-tips-tricks/colette-sewing-handbook-gathering-stitches
- Match the waistline on the zipper: After you’ve sewn one side of the invisible zipper, make sure the waistline will match on either side. Zip up the zipper and pin the unsewn half together, matching at the waistline. You may also want to use a fabric pencil or marker to draw the spot on the zipper tape.
- Have fun with the hem: Play with the way you hem the dress. While the pattern calls for a simple turned over hem, think about blind stitching or even adding extra fabric for a deep hem. To make it a little extra special, add some lace tape or contrast bias binding to the inside of the hem.
Getting started with your muslin
When I first started sewing I had no idea what muslins were or that I should be tracing patterns and not cutting directly from the tissue paper. Oops. I know that most of you are following from the first sew-along so this post will be redundant, but hopefully there are some new seamstresses out there that can benefit from this information.
Essentially, muslins are your test garment for practicing a tricky technique or making sure that a garment will fit you properly. Some people will make theirs out of actual muslin fabric while others will use less expensive fabric to make a "wearable muslin." It is important to make one, as you will feel confident on the fit and size before cutting into your nice fabric.
Measurements
Before cutting into your muslin you will need to take your measurements to determine what size you are. The best way to do this is in the underwear/bra that you plan on wearing in your outfit. I can speak from experience, correct measurements are important!
When I first started sewing I thought that since my bra size was a 34 I would use that number for my bust measurement. WRONG! That number is actually for the under bust. Don't make guesses, take the five extra minutes to verify your size by measuring yourself. I have made the following images to help out with where you should measure.

Use a flexible measuring tape and measure across the fullest part. This can be tricky to do yourself, so you may have to ask for help.


Write down your measurements as soon as you are done. I wrote mine on a post it note and stuck it inside my Colette Sewing Handbook book for future reference.
Once you know your measurements you will look to the pattern to see what size you are. Ladies, don't get bummed out by sizing and numbers. I used to work in a clothing store and women would come in and complain about sizing. "REAL women couldn't fit into this." "I'm a true size ___ and this doesn't fit." Clothing companies have different standards for sizing and guess what, everyone has different bodies. Don't stress if your measurements for your bust, waist, or hips don't all fall in the same size, we'll go over alterations in the future.
Patterns
Some people trace onto a thin paper to preserve their original pattern. This is ideal for people like me that are new to sewing, not 100% certain on sizing, and will need to make adjustments to the pattern.

Some people trace onto tracing paper, freezer paper, or even exam paper from doctor's offices! I haven't had any luck locating the exam paper, so I usually use freezer paper because I can pick it up from the grocery store. It isn't the most convenient because I have to tape pieces together, but it works!
I lay the paper on top of the pattern and carefully trace and transfer any markings onto the freezer paper. I use pattern weights on top to make sure the papers don't slide around. Speaking of pattern weights, I use metal washers that my husband got me from the hardware store :)

Muslin
First, I iron my muslin and fold it in half, selvage to selvage. I put my pattern pieces on top of the fabric in the order shown on the directions, put weights on the pieces, and then carefully cut out along the pattern with a rotary cutter. Make sure to have a cutting mat below or you'll cut into your table! No, I haven't done this... yet.
I know that I am not an expert and we all can learn something new, so please do not hesitate to give me some of your tips, tricks, and opinions. That goes for this post and all future posts. This is a community sew-along and there are a lot of talented sewists out there and I would love to hear what you have to say! :)
Don't be shy, if you have any questions you can ask here or in the Sew Colette Flickr group.
The Hazel Schedule
Monday, June 4th: The Muslin
Monday, June 11th: Fit Techniques
Monday, June 18th: Fabulous Fabrics
Monday, June 25th: Sewing Hazel
Monday, July 9th: Hazel Parade
New Look 6872
My husband says that I have a one track mind and when it comes to sewing and I definitely agree with him. Earlier in the week I decided that I wanted a new skirt to wear for the weekend, so on Thursday night I did the cutting and Friday night I sewed it up.


Subscribe to:
Posts
(
Atom
)

10 comments :
Post a Comment